For the full article and slideshow instructions, click here.


Today, I whipped up some lotion bars for the TVAM Holiday Fair. As far as bath and body products are concerned, lotion bars are some of the easiest to make. They are awesome for super dry skin, and they last a long time. And the ones I just made, smell...scrumtrilescent!....Half are Cucumber-Melon-Kumquat and half are Sage and Lemongrass. Here is my super easy recipe:
1 part Sweet almond oil
1 part Beeswax
1 part Coco Butter or Shea Butter (or a mix of the two. That's what I did)
Fragrance oil to desired strength.
In a microwavable glass bowl, combine the beeswax and the butter(s). Microwave on high until melted, stirring occasionally. Mix in the almond oil and the fragrance oil. Pour into molds.
Once your lotion bars have cooled and hardened, they are ready to use.

We had our first storm of the season this week. What better time to do some crafting with the kiddos. (OK, kiddo...Kyle doesn't craft, he mostly just destroys stuff.) Jayson is my crafter, if it involves paint and glue, he's there! For our wreath, I just had him go wild with red and yellow paint on a paper grocery bag. I figured the orange would just sort of happen, and it did. While he took his nap, I cut out the leaves. When he woke up, we got to constructing the wreath. I used a paper plate as a base. I just put double sided tape on the back of each leaf and let him stick them where ever he pleased.
But, that's not the end of this crafty story...
We had a pretty good earthquake last night, and our poor wreath fell off it's shelf and broke into a million leafy pieces. I will be reconstructing said wreath with my glue gun. Double sided tape and earthquakes suck.


Jayson has been asking me if he can sew. So, I came up with this little project for him. It's the paper plate shaker that we all know and love, with a stitchy twist.
1: Have your lovely and well behaved child, decorate two paper plates. You can get MUCH more involved in this step than we did. You can get crazy with glitter and paint and all kinds of stuff. Jayson was OK with just coloring it. Take note of his time-saving technique.
2: Here are your fabulously decorated plates.
3: Add some dry beans/ rice/ macaroni to one of the plates.
4: Glue your plates together. I used hot glue, because I love my glue gun.
5: It should look something like this.
6: Poke or punch holes evenly around the edge.
7: Have the aforementioned well behaved child sew around the edge with yarn and a blunt-tipped needle.
8: Ta-Da!

Yesterday, Jayson and I wanted to make a puppet. We originally wanted to make a T-rex. That didn't go so well....Then I thought, "you know what would be awesome?...A Venus Fly Trap puppet." Not only are Venus Fly Traps super cool, they are also WAY easier to make than a T-Rex!
You too can make a Venus Fly Trap puppet with the quick tutorial below. Fire up your glue gun and dig out those googley eyes!
1: Cut out an elongated circle with wiggly edges. This is the "head" of the fly trap.
2: Run a line of hot glue about 1 1/2" from the center line, then fold in half.
3: It should look like this.
4: Cut a half circle from the folded shape. Your hand will have to fit through here, so make it large enough.
5:It should now look like this.
6: Cut a rectangle, so that when it is rolled into a tube with a 1/2" overlap, it will fit into the hole you just cut in your wiggley shape. Add glue and roll into a tube. This is the stem of your fly trap.
7. Cut another piece of felt to fit the inside of your fly trap. Glue down just around the edges, as you will need to be able to get your hand in here.
8: Cut out a leaf shape like this.
9: Run a line of glue down the center of the leaf.
10: Fold the leaf in half. Press together along the crease. When the glue has cooled, open it up.
11: Glue the leaf to the bottom of the tube. Glue at the bottom only.
12: You should now have something that looks like this.
13: Cut out pieces for a fly, and get some googley eyes.
14: Make a fly
15: Glue the fly into the mouth of the fly trap.
16: Hand sew the head to the stem. Make sure to sew the little flaps down to the sides of the stem.
Enjoy your new super awesome puppet.
Click on any of the pictures for a closer look.

I've been scoping 2-at-a-time Socks for a while. Two socks on one circular sounds awesome. DPN's drive me nuts! Does anyone have the book? Is it worth my $$?
In other knitting news: I just bought a bunch of bamboo circulars off of Ebay. (I can't hold on to the metal ones I bought!) And I ordered some wool yarn to make the Curly Purly soaker(a wool cover for cloth diapers). Its going to be turquoise and brown striped with brown cuffs and waistband. Super cute! I can't wait until all my stuff gets here! 
Here's an example of some Curly Purlies from Bear Toes.

This is my first attempt at amigurumi. It's a fun little Easter bunny for my cousin's 3 year-old girl. She is the only little girl in the family, so she gets all my girly crafts. Like this one.
I think it turned out alright. I did make one mistake though; I used yarn from hell. I used that fuzzy, cobwebby acrylic stuff. If you feel the urge to use fuzzy yarn for amigurumi, just don't. My hands were killing me from trying to force the crochet hook through all those little fibers.
I used this pattern. It was OK, but I did need to to add many more rounds to the legs to get the "string bean" look shown in the picture.

Here is a little tutorial for creating note books from recycled greeting cards and random paper. The technique used is called Japanese Stab Binding.
I am trying out a new slide show format for this tutorial, let me know what you think.
You can click the stop button to go through the images at your own pace.


Here is a sneak preview of one of the goodies in my new (yet to be opened) Etsy shop. This little owl is sure to keep your needles cozy!

These are the lovely party favors I made for Jayson's party. I had planned on buying some of those cute little Chinese take out style boxes. But it turns out that I am incredibly cheap. I am actually, physically incapable of paying $27 for party favor boxes for a 3 year old's birthday party. Yeah $27 for just the boxes...let me just write you a check out of my invisible checkbook...
I decided to make the little bags myself out of the left over scrapbook paper from the Balls of Fury. I found a template online, adjusted it to fit my little bottles of party bubbles, and went to work. I printed little monsters on the paper first and then cut out the bags. A stamp would have been easier and cuter, but guess what... there were no monster stamps at Michael's and it was too late to order one online. Besides, I don't think a bunch of preschoolers will care.
I used hot glue to put the bags together and punched a hole in the top; finishing them off with a cute ribbon. Take that, overpriced miniature takeout boxes!
Materials:
1/3 pack of scrapbook paper- $2
24 pack of party bubbles- $7
2 rolls of ribbon- $4
Total cost: $13 for 24 favors

This is post #1 for Jayson's super awesome ultimate monster party! I made these sweet paper balls to hang up. I used this pattern as a starting point. I decided to use staples instead of glue, allowing the tabs to open up. I just thought it looked cooler. And of couse I made them WAY bigger. The big one is about 16" across.
I'll be keeping a running tab of my expenses. I am interested in seeing just how much this thing costs me. We are expecting about 50 guests, including kids and parents.
Materials:
2/3 of a pack of scrapbooking paper
Staples
Total cost $4

Wasn't it Halloween like last week?! What happened to all this time I thought I had before Christmas? The time for Christmas crafting has pretty much come and gone, and I missed out on making so many awesome holiday craft projects. This is one of those projects. I really wish I'd had time to make these ADORABLE felt trees from Thompson Family Life.
Next year...next year...

I LOVE girly stuff! I love pink. I love sparkly. Ruffly. Ribbons. Bows. Poufy, froufy and fluffy too. I love it all.
I've really been wanting to make a tutu lately. But who would be my pink tulle covered victim? I get spit-up on too often to wear one around the house myself. Both of my kids are of the male variety. So I had to move on to my extended family in my search for a lucky tutu recipient. I decided that my cousins three-year-old, Emma NEEEEDS a tutu.
The tutu making process was rather painless.
Step one: Find a toddler you have laying around the house. Use this small person to figure out the waist and length measurements of a similarly sized toddler.
Step two: Make a band of elastic according to your measurements.
Step three: Go nuts slicing 6 yards of tulle into incredibly uneven and misshapen strips.
Step four: Tie tulle strips to the elastic band. Hope that no one notices that the tulle looks like it was cut with a chainsaw.
Step five: Add bows and admire your handiwork.

Since we moved to Dublin, back in April; I have had no designated craft area. This is NOT working! I am not a "casual" crafter, I am a hardcore, nearly every single day crafter. The dining table is not an acceptable area for this kind of crafting. I wanted to create a "craft nook" in our bedroom. But, my hubby had a long list of objections. He suggested I get a craft armoire. Huh? Why does he know about craft armoires when I have never heard of one? Anyways, I did a little research, and now I totally want one! The one by Sauder is perfect. It even goes with my other bedroom furniture. So it's all good, right? Negatory. The one I want is about $400. That's $400 more than I currently have in my craft armoire fund.
So, um..yeah...Donations can be sent to...
I need to do some serious Craigslist/Ebay fund raising. Anybody want to give me large amounts of cash for my old junk?
Ok, so I'm way into monsters right now. This means I went nuts making monster themed toys for Christmas! (Jayson will also be having a monster 3rd birthday party in February. But that's another post...)
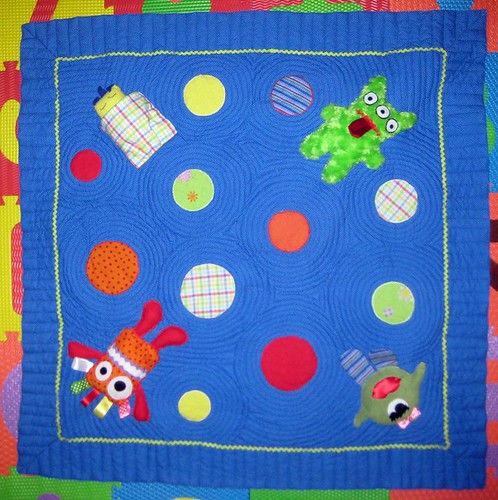
I made Kyle (6 months old)a monster play quilt, complete with rattle-y and crinkly goodness. This was my first quilting project. I still haven't decided if I love or hate quilting. On one hand, I love the result and the creative freedom; on the other hand, it's booooring! I don't think I'll ever do a huge quilt, but I think there are some quilted pillow covers and maybe some place mats in my future.
For Jayson (almost 3) I made a monster bowling set out of felt. It's pretty flippin' awesome. Unfortunately, I forgot to take a picture of it before I wrapped it! So, it will have to get it's own post after Christmas.
I have become the Crazy Felt Lady lately, as I also made felt food, a felt crayon roll and felt book. My house currently looks like it was hit by a felt hurricane. Maybe I should be cleaning instead of writing this...nah...


 Posts
All Comments
Posts
All Comments